Wednesday, February 28, 2018

Mixed Media Mini Journal

I truly enjoy mixing projects up lol.  Today I'm sharing a mini mixed medial journal I created.  It's nice to have a small blank canvas to work on when the urge to get a little crazy crafting strikes.  This was a couple day project, as the bottle cap was custom made along with dry time for the texture paste.


I really had no idea what I was going for when I started this project.  I had made a trip to a little scrapbook store over the weekend and picked up some of those AMAZING Dylusions Paints.  It was then I started thinking, why not create a fun album filled with blank pages to create on whenever the mood struck.  So I set out to find the perfect die set and chose to work with the Sizzix Mini Album die.  There's so many fun elements included in this set that I know I will work with in the future.  So now to decide the cover...  well I love flowers and instantly fell in love with the flower and flourish from the Valentina file.  So now that I had a rough idea, it was time to get started.

First thing to do - create a custom and unique bottle cap.  I chose a regular sized bottle cap, but didn't want it to be tall.  Ran that through the BigShot and it flattened the high edges.  I cut a 1" circle from some beautiful teal paper and adhered that inside.  Knowing I wanted to add some type of natural element, I chose a veneer butterfly and wanted to add an ombre effect with those amazing paints.


I really love how the painted butterfly turned out.  So that got adhered to the bottle cap with a little bit of liquid glass.  I then added some Nuvo glitter drops along the top.  Now fill it with resin and slowly watch those air bubbles pop.  Time to leave that sit overnight.


Now onto the album cover.  I cut the cover from mat board using my Cameo (took many times to get it to cut all the way through!) and cut my binding piece as well.  The cover got a quick coat of gel medium so the layers of paint wouldn't warp the mat board.  I then took one of my new stencils and some texture paste and added some areas of texture.  Now, leave everything to dry.


With everything completely dry, it's time to add some color and finish this album up.  I wanted to create the same ombre look for the cover, so I used the same paints on the butterfly.


Now to add the flower.  I cut each section out of stencil vinyl.  The stencil vinyl allows it to be removed without damaging the layers of paint and texture.  Each layer got painted or filled in with Glaze pens.


While that was drying, I had to make the blank signatures for my album.  I used Neenah Solar White 110lb paper.  It's super thick and when coated, it would be able to handle many layers of media.  I added 4 signatures with one page having an additional fold-out.


When everything was dry, it was time to bind the album.  I used some scrap twine for mine and used a blanket stitch to bind the signatures.


With the album almost complete, it's time to add that binding cover.  I added the bottle cap to the front cover and added some ChitChat stickers to create a fun sentiment for the cover.


Now it's time to fill those pages =)

For this fun project, I used the following:

KaDoodle Bug Designs ~ Valentina
Silhouette Cameo
Sizzix Big Shot
Sizzix Mini Album Die set
Sizzix Mat Board
DCWV The Blossoms Butterflies Stack
Ice Resin
The Paper Studio BottleCap
American Crafts wood veneer butterflies
Stencil Vinyl
Nuvo Crystal Glitter Drops ~ Pink Champagne
Liquid Glass
Ranger Texture Paste
Liquitex Gloss Gel Medium
Dylusions Paint ~ laidback lilac, mushy peas, rose quartz
Martha Stewart Aquarium Pearl Paint
Anita's Metallic Craft Paint ~ Amethyst
Sakura eGlaze Pens
Dylusions Small Stencil ~ Holes Small
Tim Holtz idea-ology ~ ChitChat Stickers
Distress Ink ~ walnut stain


Tuesday, February 27, 2018

Sweet as Cupcakes

I've been meaning to make an eclipse card forever since I've seen one.. well I decided today was the day!  I don't have a lot of sentiment/word dies, so I opted to create my layers using my Cameo.  This way, I get to use my favorite fonts and any size I feel works with my card.  


So I chose to use the CK Cupcake Bears file from KaDoodle Bug Designs.  I only wanted to use one of the cute cupcakes, so I picked my favorite from the included jpeg file and traced/detached that in the Silhouette Studio.  I created my eclipse word Sweet using Blenda Script font.  I did offset it to give it a little bolder appearance.  

As you can see below, this is my print and cut setup.  The text will not show up on the print as I am only showing you in the example.  I have turned off a fill and outline for the text.  After it printed, I used my Cameo to cut the rectangle and the text from the area.


I then cut 3 more layers of the word Sweet so it would pop up the original cutout.  I glued all the layers together, with the cutout from my printed image on top.

I created a 4 x 5 1/4" base in the software and positioned my text where I wanted it to print.  I filled the lettering black and make the text outline black, then printed it.  I cut the piece of pink paper down to the 4 x 5 1/4" mat.

I cut a piece of patterned paper using the Die-namics Bracket Edge die.  I carefully placed that under the white printed section, ensuring the paper did not show through my "sweet" cutout.  I added one last small rectangle of patterned paper under the bracket to give a little more color.  I went ahead and placed my blue mat to my white card base.

To add texture to the card, I wanted to add a pretty pink/white twine bow. Once attached and tied, I glued my pink base to the whole card base.  I then added my layered "Sweet" back to the cutout area.

No card is complete without some added bling.  I added some stickles to my frosting and a few Nuvo drops as well.


Here you can see how the additional layers have popped up the text.


For this fun card I used the following:
KaDoodle Bug Designs ~ CK Cupcake Bears
doodlebug designs ~ sugar shoppe paper pad
MFT Die-namics ~ Bracket Edge Duo Dies
ColorBox Chalk ~ Berrylicious
Gelly Roll Pen ~ Black
Scrappy Moms Twine
Nuvo Crystal Drops ~ Glitter Drops Pink Champagne
Stickles ~ Cotton Candy


Monday, February 26, 2018

Challenge Time

Happy Monday!! Today we are starting the weekly challenges again at KaDoodle Bug Designs.  They challenges will run Monday through Sunday, with a winner and new theme posted each Monday.  The lucky winner will receive a file of their choice!  How fun right?!?  So if you want to join the fun, please join the Facebook group clicking here.  

This weeks challenge is a tic-tac-toe board ~ you pick your winning line!


I chose to work with the Yellow, Pink and Purple line.  Such fun colors for this Easter card I've been eager to make.


I love these little peeps lined up, just chillin' in the grass =)

Now be sure to head over to our Facebook Group and enter the challenge!!


For this card I used the following goodies:
KaDoodle Bug Designs ~ Eggie Buddies Peep Chick
Bazzill Cardstock
Recollections Cardstock
Authentique ~ Springtime Cardstock
MFT Die-namics ~ Snow Drifts Dies
Scrappy Moms ~ Spring Fling Stamps
Archival Jet Black Ink
ColorBox Chalk ~ Warm Green, Sour Apple, Pumpkin Spice, Blush Rose, Warm Violet, and Ocean
Enamel Accents ~ Black
Sookwang Double Sided Tape
Blue Ribbon


Friday, February 23, 2018

Lucky Waterfall Card


Happy Friday!! I have set a goal for myself to showcase at least one new card a day... so far so good this week!  Today I'm sharing a fun interactive card.  Waterfall cards have always scared me, as I thought they would be super hard to make.  So I put my fear aside and set out to finally conquer this fun card!!


To start this card, I first had to print out my digital stamp. I chose to use the cute little Clover Slushy as the main image for my card.  I printed the image on Mi-Teintes paper ~ the BEST paper for colored pencils in my opinion. I then cut all the cardstock I would be using for this card.


Cardstock Dimensions:
Base 4 1/4 x 5 1/2
Mat 4 1/8 x 53/8 (optional)
Patterned Paper 4 x 5 1/4
(4) image mats 2x2
(4) image squares 1 3/4 x 1 3/4 (colored pencil paper)
Pull tab 2 x 9
Strap to hold pull tab in place 1 x 4 1/4

Next, I stamped the remaining 3 squares with random Studio G St. Patrick's Day themed stamps.  Now onto the best part... COLORING!!


Once I had all my images colored, it was time to start assembling the waterfall card.  I did chalk all the edges of my pieces before assembling. Adhere the patterned paper and mat to your base.  Glue your stamped images to their mats as well.

Add the strap piece about 3/4 the way down your card ONLY on the sides.  You'll come back later and add your brads. Next you'll want to score the pull tab at 2", 2 3/4", 3 1/2" and 4 1/4".


Before assembling the waterfall, I decided to stamp my sentiment to ensure I got a smooth stamp that wasn't affected by all the layers.  Just below the 4 1/4" score line you'll want to place your sentiment.


You're next step would be to place the waterfall tab under the strap you adhered on the card base.   Using a 1" circle die, I centered that on the pull tab, only using half of the circle.  Remove the pull tab and run that through the BigShot to cut a half circle from the base.


Now, lets assemble the waterfall tab.  You'll want to place a strip of double sided tape to the TOP of each stamped image square (after you matted them).  Place the adhesive top just below the SCORE line.  Do this for all 4 images.


Slide the waterfall pull tab back under the strap.  Place a piece of double sided tape to the BOTTOM image and center that along the bottom edge of the strap.  This will hold that tab in place.  


Add your 2 brads to the sides of the strap using a handheld hole punch.  Cut a piece of ribbon and staple that to the middle of the tab along the bottom, centered between the earlier cut circle.


Here's a video of the waterfall in motion. (I'm not a video person so bare with me through this one lol)


For this fun card I used the following goodies:
KaDoodle Bug Designs ~ DS Clover Slushy
Bazzill cardstock
Canson Mi-Teintes Paper
Prismacolor Pencils
Studio G St. Patty's Day stamps
Archival Jet Black Ink
Distress Ink ~ mowed lawn and peeled paint
Archival Ink ~ Jet Black
ColorBox Chalk ~ Green Apple
Kuuqa Circle Stitched Dies
Sookwang Double Sided Tape
Brads
Ribbon


Thursday, February 22, 2018

Lucky Fox

One of my all time favorite things to create are quilts!  I've been an avid quilter for many years and there is by no means a shortage of blankets at my house lol!  So when I saw this Pinwheel quilt design for paper I knew I had to jump on board. 


I got all my elements for the fox ready to cut with my cameo.  I'm one of those paper hoarders that saves all my scraps that are at least a 1" square lol.  They come in super handy when piecing images.


Once everything is cut, I begin the chalking process.  Each piece will be chalked to add dimension.  For the base of the fox, I like to use my eBrush and a Sharpie marker to make all the edges a solid color.  


I also like to stamp my sentiment before adding any additional layers to ensure I get a smooth stamp.  I love this stamping tool!! I allows you to stamp multiple cards in the same spot or restamp if the stamp is a little blotchy.  I chose a fun sentiment from Scrappy Moms ~ oh how I wish they were still in business!!


So now it's time to start the pinwheel block.  Here are the pieces will you want to cut:
2 ~ 3 x 3 squares of colored cardstock for the base
2 ~ 2 7/8 x 2 7/8 squares in white
8 ~ 1 3/8 x 1 3/8 squares cut out of 2 different patterned papers

Start out by gluing your white squares onto your colored bases.  Then overlap them and adhere to each other.  I glued mine about 1/2" from the points.


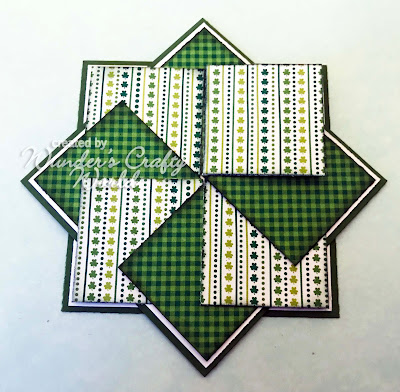
Next you will start assembling your overlapping patterned paper.  You will want to ONLY glue half of the first square in place as you will need to put half of your last piece under this one.  So my first square is the green plaid one pointing to the top and only the LEFT side is glued.  You'll continue gluing the other patterned paper onto the next section, overlapping the first.  Continue doing this around.  You'll notice all the first group of patterned paper are on one square while the others are on the second white square. When you get to the last piece you will see how the 2 pieces meet without creating the overlap.  You will want to carefully glue the left side of the top piece UNDER the first square.  Then glue that section down.


Once your quilt sections is complete, add it to your card base.


You are all set now to add your pieced fox or any type of embellishment if you are not adding a cute piecing.


Hope you enjoyed this card!  

All the goodies I used on this card are as follows:

KaDoodle Bug Designs ~ Shamrock Fox Peeker
DoodleBug Designs pot o'gold paper pad
eBrush
Sharpie ~ Green
Bazzill Cardstock
ColorBox Chalks ~ Deep Green, Warm Green, Sour Apple, Burnt Sienna, Creamy Brown, Blush Rose
Scrappy Moms Stamps ~ Spring Fling
Archival Ink ~ Jet Black
Stamp Perfect
Tombow Mono Liquid Glue
Zig 2 Way Glue
Stickles ~ Firefly
Pebbles Classic Chalks
Recollections Black Pen
Gelly Roll Pen ~ White


Wednesday, February 21, 2018

Easter Blessings

I have a super fun Easter card for y'all today!!  Took me FOREVER to finish it as I' still in my lovely arm splint, but it was so worth the challenge to finish it lol.  Are these little chicks not the absolute cutest?!?!


Here's how I created this card:

The base is a piece of cardstock cut with a slant.  It was cut 3" to 4" and 10 7/8" wide.  To create the grass, I used my Lawn Fawn Grassy Border die and my Sizzix Big Shot.  The edges are distressed using a couple different shades o green Distress Inks. Fold the card in thirds (3 5/8" from both sides).


The basket on the front is cut 3 5/8" wide and 2 1/2" tall.  The lip is 3/4" wide.  You can make these whatever dimensions you want or simply create any type of front for your card.  I distressed my pieces before embossing them.


The sentiment is stamped on a 3/4" piece of pink cardstock with chalked edges. I then added some Liquid Pearls to resemble tacks to attach the sentiment.


Once all my pieces were cut for my chicks, the edges all needed to be chalked. After they are all done, it's time to assemble them.  These awesome files come with a base for you to assemble the pieces on, making the back a solid piece ~ which is great for this type of card!  I cut my bases from yellow cardstock so they would look cute from behind as well.  Once everything is assembled, it's time to place your chicks behind the grass.   I placed all mine so they were still mostly visible when the card was flat.


For this fun card I used the following goodies:
KaDoodle Bug Designs ~ Eggsploding Sweetness
Lawn Fawn Grassy Border Die
Scrappy Moms Spring Fling Stamps
Paper Studio  Wood Grain Embossing Folder
Distress Inks ~ walnut stain, rusty hinge, mowed lawn, peeled paint
ColorBox Chalks ~ Pumpkin Spice, Blue Lagoon, Burnt Sienna, Orchid Pastel
Pebbles Classic Chalks
Archival Jet Black Ink Pad
Bazzill Cardstock
Liquid Pearls ~ Platinum Pearl
Tombow Mono Liquid Glue
White Gelly Roll Pen
Black Recollections Pen
Silhouette Cameo
BigShot 
Stamp Perfect


Tuesday, February 20, 2018

You Da Bomb!

Here to share another card using a new file from KaDoodle Bug Designs called Shoptastic Cuties ~ You're the Bomb.  If you haven't checked out the new file section, you really should!!  Lots of adorable cuties!!


I cut all my pieces using my Silhouette Cameo. I love the fabulous cuts I get from this machine.  I'd be lost without it!!


For the bomb pieces, I dusted off my eBrush machine and accented all the edges with a grey Sharpie marker.  I then came back and accented the edges with the ColorBox chalk.  Each piece got the edges chalked for added dimension.  Once they were all done, I assembled the bomb and went to work on the eyes.

Keeping this card simple, I decided to only add 2 accent strips and a simple sentiment.  For the sentiment, I cut my 1" circle from a stitched die and also cut a 1" circle from a scrap piece of paper using my Cameo.  I removed the cut circle and replaced it with my stitched circle.  Then I created my sentiment and used my Chomas Creations pen holder to sketch the text.  What a super fun way to create your own sentiments!

For this card I used the following:
KaDoodle Bug Designs ~ Shoptastic Cuties You're the Bomb
Recollections ~ Valentine's Day Paper Pad
Pretty Pink Posh ~ Impress Valentine Mix Sequins
eBrush
Sharpie ~ Grey
Stickles ~ Xmas Red
Kuuga Stitched Circle Dies
Silhouette Cameo
Chomas Creations Pen Holder
ColorBox Chalks ~ Ocean, Blue Lagoon, Blackbird, Warm Red, Pumpkin Spice
Studio G Chalk ~ Pink and White
Pebble Classic Chalks
Recollections Black Pen
White Gelly Roll Pen


Monday, February 19, 2018

Perfect Pear

Happy Monday everyone! Today I'm sharing a little card with y'all.  I tried to keep it simple and have the main focus the adorable set of pears =)


I started by cutting everything for the pears with my Silhouette Cameo.  I then chalked all my edges of the pieces.


Once they were all chalked, I assembled my pears.

I took a piece of Tim Holtz Distress Watercolor cardstock and created a little background with 2 distress markers and a water brush.  I didn't have a design in mind so I went with just a random spot of ink.


Next I took some green twine and separated the strands.  I only wanted the green strands for this project.  I randomly glued the two strands over my distressed spot.  To finish out that area, I cut a 3" circle from a sheet of vellum and trimmed a 1/2" off one edge.  Adhered that over the distressed area and the base was done.

Using some foam tape, I adhered the two adorable pears. Are they not the cutest?!?


Add a few little sequins and a veneer heart and the card is complete =)

For this card I used the following goodies:
KaDoodle Bug Designs ~ Shoptastic Cuties You're Pearfect
Tim Holtz Distress Watercolor Cardstock
Tim Holtz Distress Markers ~ Vintage photo and mowed lawn
Waterbrush
Bazzill Cardstock
Kuuqa Stitched Circle Dies
Recollections Vellum paper
Sookwang Double Sided Tape
American Crafts Wood Veneer Heart
Pretty Pink Posh ~ Impress Valentine Mix Sequins
ColorBox Chalks ~ Warm Green, Warm Red, Chestnut Roan, Ocean Blue
Stickles ~ Tropical Tangerine
Pebbles Classic Chalks
Black Recollections Pen
White Gelly Roll Pen
Foam Tape