I got all my elements for the fox ready to cut with my cameo. I'm one of those paper hoarders that saves all my scraps that are at least a 1" square lol. They come in super handy when piecing images.
Once everything is cut, I begin the chalking process. Each piece will be chalked to add dimension. For the base of the fox, I like to use my eBrush and a Sharpie marker to make all the edges a solid color.
I also like to stamp my sentiment before adding any additional layers to ensure I get a smooth stamp. I love this stamping tool!! I allows you to stamp multiple cards in the same spot or restamp if the stamp is a little blotchy. I chose a fun sentiment from Scrappy Moms ~ oh how I wish they were still in business!!
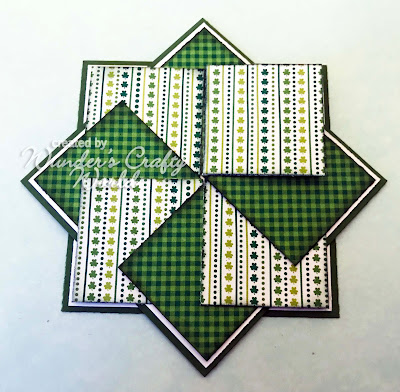
So now it's time to start the pinwheel block. Here are the pieces will you want to cut:
2 ~ 3 x 3 squares of colored cardstock for the base
2 ~ 2 7/8 x 2 7/8 squares in white
8 ~ 1 3/8 x 1 3/8 squares cut out of 2 different patterned papers
Start out by gluing your white squares onto your colored bases. Then overlap them and adhere to each other. I glued mine about 1/2" from the points.
Next you will start assembling your overlapping patterned paper. You will want to ONLY glue half of the first square in place as you will need to put half of your last piece under this one. So my first square is the green plaid one pointing to the top and only the LEFT side is glued. You'll continue gluing the other patterned paper onto the next section, overlapping the first. Continue doing this around. You'll notice all the first group of patterned paper are on one square while the others are on the second white square. When you get to the last piece you will see how the 2 pieces meet without creating the overlap. You will want to carefully glue the left side of the top piece UNDER the first square. Then glue that section down.
Once your quilt sections is complete, add it to your card base.
You are all set now to add your pieced fox or any type of embellishment if you are not adding a cute piecing.
Hope you enjoyed this card!
All the goodies I used on this card are as follows:
KaDoodle Bug Designs ~ Shamrock Fox Peeker
DoodleBug Designs pot o'gold paper pad
eBrush
Sharpie ~ Green
Bazzill Cardstock
ColorBox Chalks ~ Deep Green, Warm Green, Sour Apple, Burnt Sienna, Creamy Brown, Blush Rose
Scrappy Moms Stamps ~ Spring Fling
Archival Ink ~ Jet Black
Stamp Perfect
Tombow Mono Liquid Glue
Zig 2 Way Glue
Stickles ~ Firefly
Pebbles Classic Chalks
Recollections Black Pen
Gelly Roll Pen ~ White


No comments:
Post a Comment