Wednesday, June 27, 2018

Hibiscus Hello

Tonight I'm sharing a tropical eclipse cared with y'all.  I love the look of these cards and this one was a challenge.  I decided to use a paper piecing to cut my big bold sentiment out of, which was a little more than I thought it was going to be.  There were many pieces that needed to be reattached to the main hello die cut, but in the end, I LOVE how it turned out.

To start, I cut all my pieces on my Silhouette Cameo and wanted to use my eBrush to ink the edges. I use Sharpie markers in my eBrush.


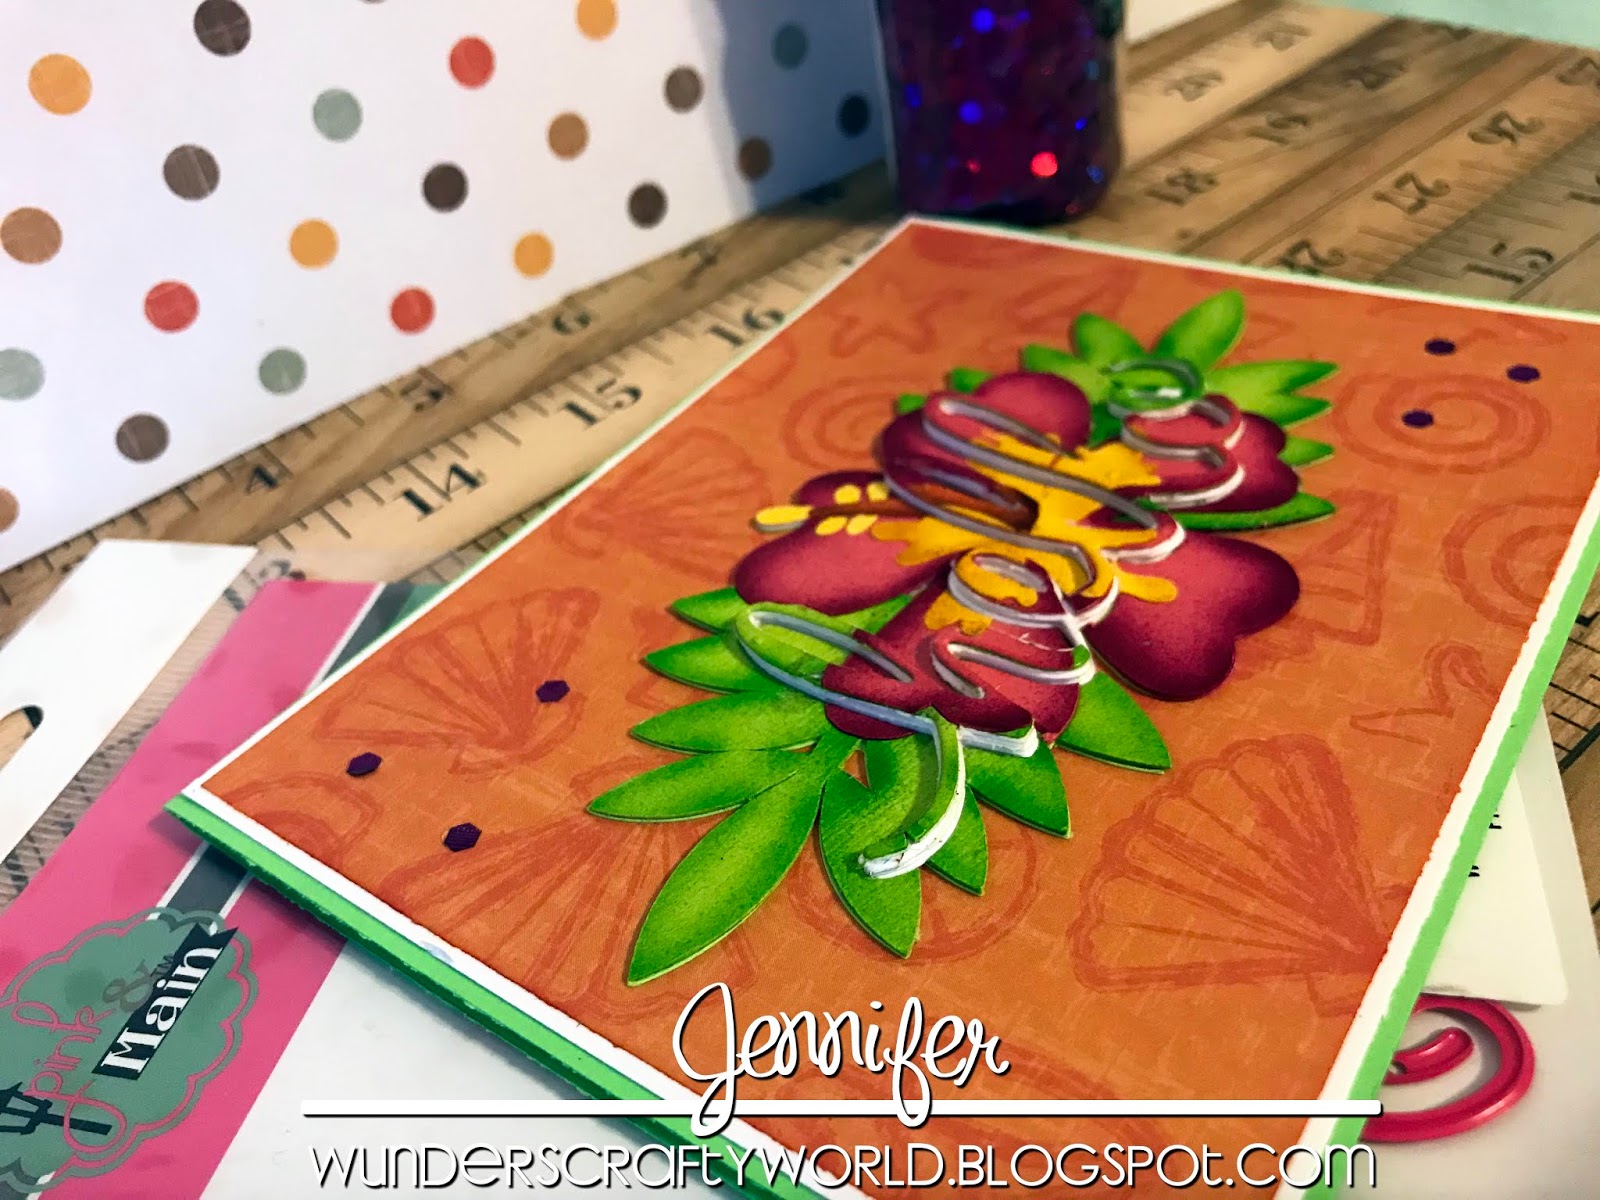
Here is my beautiful hibiscus flower assembled.


Next, I took my big hello die from Pink & Main and cut it out of my assembled hibiscus.


Take the word out of the piecing carefully, saving all those little pieces so when it's reassembly time you will have all those pieces.  I should have made the flower bigger so there were fewer pieces, but it wasn't hard to keep track of all the small pieces.


I cut 6 of the hello sentiments out of white cardstock to layer which will raise the hello from the flower once assembled.


Here you can see the flower reassembled.  I did cut another base piece to attach all the pieces to so it would be one finished piece. 


I chose to keep the card simple so the flower would really pop.  I added a few pieces of chunky glitter for a little bling.


Thanks for stopping by and checking out my card!

Goodies used on this card:
KaDoodle Bug Designs ~ Tropical Hibiscus
Pink & Main ~ Hello Die
eBrush
Sharpie Markers
Bazzill Cardstock
Recollections Cardstock
Paper Studio ~ At the Beach Stack
Recollections Chunky Glitter

d

Kindred Stamps June Release


Welcome to the June release for Kindred Stamps.  Another super amazing set to work with this month ~ The One With The Friend.  So many stamps in this super set and so many fun possibilities.  You will definitely want to add this to your collection.

The other sets coming out are so cute and I hope you enjoy them too! As always, make sure you hop along with the blog hop to be entered into the drawing for a $10 store credit. Please come join us at the Kindred Stamps Fan Club to see fun all month long, and share your projects too!


My first card is one of my favorite characters.  I thought it'd be fun to have him hiding behind a little door, as I always remember him showing up in odd places.  Simple card, but still a fun one to give and create.


And that penguin is such an adorable touch!!


This has to be one of my favorite cards to create.  Accordion cards are fun for the recipient to reveal the message inside.  Not to mention, they are a lot of fun to make!! 

I thought it would be fun to leave a coffee stain on the front cover - after all, the coffee shop was a big part of the series.


Once the card is opened and expanded (there is a video below showing that) you can see the special message.  This card is easy to accommodate any message inside.  I decorated the left inside with two iconic characters that represent these two perfectly.  I added my little monkey to the inside of the cup by making part of his body.


The back piece I wanted something different so I stamped the lobster with a VersaMark watermark pad.  After letting it dry, I used some Distress Ink to color the Bristol paper.  I then rubbed the ink off the lobsters so they would show through.


And here is the card in motion.


This is the end of my term as part of the design team.  It's been such an honor working with these amazing stamps and super talented women.  

The lineup for today:


Wunders Crafty World *You are here*

R. Winn Creates  *Next stop*


Thank you so much for joining this amazing hop!  Hope you have enjoyed all the amazing projects so far!


Sunday, June 24, 2018

Beautiful Florals

Happy Sunday!  I'm sharing a beautiful card to brighten your day.  I used the Spring Bouquet file from LeAnn's World 101 as the focal point of this card.  Isn't this image beautiful?!


I used my Prismacolor pencils to color this beauty.  All the shadows made it super easy to color.  Once my coloring was complete, I wanted to keep the card simple and have a natural feel to it.  I chose to only add one layer for a mat using corrugated paper.  I think it adds that wonderful natural feel to the card.  Adding some twine with a little bow rounds out the card.  Sometimes simple just works lol.


My color combos for the image are as follows:
Red flowers ~ Black Raspberry, Crimson Lake, Crimson Red, Permanent Red and Spanish Orange
Leaves ~ Prussian Green, Kelly Green, Sap Green Light and Pale Sage
Yellow Flower ~ Burnt Ochre, Yellowed Orange, Canary Yellow and White
Butterfly ~ Pumpkin Orange, Yellowed Orange, Mineral Orange, White, Cool Grey in 70, 50, 30 and 10%

Goodies used on this card:
LeAnn's World 101 ~ Spring Bouquet Digital Stamp
Mientes Color Pencil Paper
Prismacolor Pencils
Nuvo Crystal Drops ~ Duck Egg Blue (accents on the butterfly and flower accent)
DCWV ~ Corrugate Natural Stack
Twine
Double Sided Tape
Foam Tape

Thanks for stopping by!


Friday, June 22, 2018

Masculine Hello Card

Making manly cards is always a challenge for me.  It's hard to create a card without some sort of bling or pink!  So this morning I stepped out of my box and tried a quick and easy attempt at a masculine card.

I love the look of embossed metal tape and thought that would be perfect for this card.  But I wanted something extra on the tape, so I thought about seeing all those cool alcohol ink projects using tin foil/metal tape.  

I started out cutting a couple pieces of tape and white cardstock.


I then attached those pieces to the cardstock so it would be a little studier when I embossed it.


Time to get messy!  I dropped some alcohol inks in blue, green, yellow, slate and silver around the tape and used my distress tool to blotch it.


Next, I dried my metal tape with my heat gun and ran it through the BigShot in a gear embossing folder.


How fun is this piece to add to this card?!


I knew I was going to use the bold Hello sentiment die from Pink & Main, but I wanted a little something extra that didn't take away from the metal piece or the hello die cut.  I chose to use part of one of the sentiments from the Fire Up stamp set from Pink & Main.  I covered the word "hey" on the stamp with washi tape, then stamped the rest.  Prior to stamping, I did die cut my mini tab so I could get the stamp in the position I liked easier.


I LOVE using these big bold sentiments.  The die cuts are amazing!


Now it's time to assemble the card. I laid the card out to get a feel of where I wanted to glue everything in place.  I realized at this point, my metal tape was too wide, so I cut that down.


I inked my edges of the gear paper and the metal foil ~ I don't like to see the white core so I covered it with black soot Distress Ink.


Now that I was happy with all the pieces, time to adhere it and finish the card.  I love how this card turned out.  Simple yet a lot of fun! 


Goodies used on this card:
Pink & Main ~ Hello Dies
Pink & Main ~ Fired Up Stamp Set
BigShot
DCWV ~ Tattered Time Stack
MFT Die-namics Mini Tab Dies
Tim Holtz Alcohol Inks
Tim Holtz Stamp Platform
Archival Jet Black Ink
Distress Ink ~ Black Soot
Bazzil Cardstock


Wednesday, June 20, 2018

Wild & Free Wrapped Journal

Since getting my wrapped journal die by Eileen Hull, I've had so many ideas running through my head about different journals I want to make.  How many journals is too many?!  Today I thought I would try a different way to decorate the journal using the same faux leather paper I used on the last one.  I've had my eye on these beautiful rustic silhouette files from KaDoodle Bug Designs and knew it would be a perfect the perfect addition to a journal idea I had.

So once again, I wet down my faux leather paper in my kitchen sink instead of running it through the washing machine.  I soaked it, rang it out and repeated until I liked the appearance of the "leather".


 Here you can see it wringed out and ready to dry.


I literally hung my leather piece outside to dry on my garden flag holder.  It's warm enough so I knew it wouldn't take long to dry completely.


Here's a comparison of the paper.  The top piece was just cut off the  roll.  The bottom is the rinsed out piece.  It's super soft after it's been worked for a while.


Time to run the paper through the BigShot and use that amazing die!!


Next is my lining.  Had I knew when I started how I wanted my closure to be done, I would have attached it to the paper before cutting anything.  But I wasn't sure where this one was going so I cut them individually.  The fabric is backed with strong Heat 'n Bond, which will keep the edges from fraying and also adhere better to the leather when I iron it.


Here's my fabric lining cut ~ I LOVE this fabric and it was the inspiration for the cover.


Front and back of the journal so far.


My original plan was to try wood burning the images on the outside, however that was an epic fail testing.  If it was real leather, it would have been perfect.  It just burned the paper fibers.  But that's ok... I have an even better plan.  I decided I wanted to paint my outer piece but wanted to keep my designs the natural color.  I cut my designs from vinyl and applied it to the journal where I wanted them.


Time to get messy!  And messy I got lol.  I used my gel plate to lay down a layer of Vibrant Turquoise Dylusions paint and randomly applied the journal to the plate.  I made sure it didn't cover every inch of the journal - I wanted it to still have the worn in appearance.  I then added some Mushy Peas Dylusions paint over the gel plate and randomly laid the cover over the plate.  You'll notice I did use some washi tape to cover my holes to ensure the paint did not seep through.


And here you can see how beautiful these colors work together!


Dry time!  I left this to dry overnight. leaving the vinyl in place.


Once it was dry, I removed the vinyl to expose the natural color of the paper.  I love the contrast between them.  I then stitched around the border with a beautiful matching thread.  Next I added my leather cording for the signatures.  I decided to have the signatures removable so the journal could be reused after they were full.  I added beads and a feather to the ends, which dangle over the beautiful tree.  


When I finally figured out my closure, I punched two holes in the center of fold.  I added a button using the same leather cord.  I tied the button in place and added a couple wood beads to the ends.


And finally, here is the beautiful wrapped journal.  Even with the paint, this leather paper is still soft to the touch.  


This couldn't have come together better.  Starting out with only a piece of fabric and letting my imagination run has really turned out for the better.

For this journal I used these amazing products:
KaDoodle Bug Designs ~ PG Wild and Free Title
Eileen Hull/Sizzix ~ Wrapped Journal Die
BigShot
Silhouette Natural Faux Leather Paper
Scrap Fabric
Heat 'n Bond 
Scrap Vinyl
Dylusions Paint ~ Vibrant Turquois and Mushy Peas
Gel Plate
Tim Holtz Accoutrements
hildie & jo wood beads
ZFP Feathers
Darice All Purpose Tacky Glue
Leather Cord
Turquoise Thread
Sewing Machine

Thank you all for stopping by and seeing my latest journal!