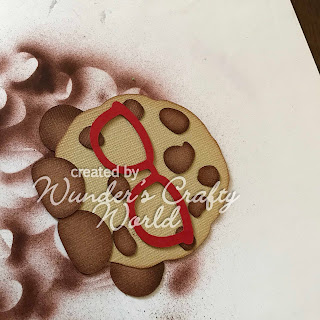
Here you will see all my pieces cut and ready to inked/airbrushed for dimension.
I chose to airbrush my "cookie" base and all the chocolate chip pieces.
Using a brown sharpie it adds a nice layer of color that gives the pieces a "baked" look. I then go over just the edges with some Chestnut Roan to make them a little bit darker.Now it's time to assemble the cookie. I place the glasses in the general area I want my eyes to be, then place the chips spaced out around the cookie. Once I'm happy with the chip placement, I will glue them in place.
I then add my eyes. I also wanted to make my chips have a little sheen like they are just at that wonderful melting point so I covered each one in Glossy Accents. I also wanted my glasses to be shiny and have some dimension so I covered those in Liquid Glass. Now let the adorable cookie dry while you create the treat holder.
The file has a flat top but you can give it a decorative edge using a border punch or a die. I chose to use a die but ONLY cut the top portion off. I put the edge under the die and ran that through the Big Shot giving me a little decorative edge.
Now it's time to get your scoring board out and score the treat holder. You will score the treat holder at all the points of the flaps. The flaps at the bottom of the box in the image below are scored 3/4" from the edge on both sides. Refer to the image if you have questions on where to score.
Next, add some double sided tape to the flaps you folded at 3/4". Adhere those to the back of the treat holder. You can add a small piece of tape to the smaller flaps and adhere those to the sides if you'd like as well.
Add a small hole using a punch to the top center. Add a little ribbon and tie it off with twine.
You can add a sentiment to the base of the treat holder if you like. I HIGHLY recommend adding it BEFORE you add the ribbon or assemble it if using a stamp pad. I did have to remove the ribbon and use an acrylic block to stamp the sentiment so it's not perfect, but you live and learn right?! =)
Once the cookie was all dry, it's time to add that to the front of the holder using some foam tape or 3d dots.
Here are a couple close-ups of the shiny chips and "plastic" looking glasses.
For those that would like to create a treat holder like I have done, I'm giving the file to y'all to download the file for free. Remember, you will need to score the holder as I did not add score lines. You can resize it to fit the size you need, just remember to lock the dimensions so the height/width stay uniform.
For the project I used the following goodies:
KaDoodle Bug Designs ~ Shoptastic Cuties One Smart Cookie
Bazzill Cardstock
Core'dinations Cardstock
Recollections Cardstock
eBrush
Sharpie ~ Brown
ColorBox Chalk ~ Toffee, Creamy Brown, Chestnut Roan, Sour Apple, Warm Green, Dark Green, and Chestnut Roan
Pebbles Classic Chalk ~ Black, White, and Pink
Recollections Black Pen
Signo White Pen
DecoArt Liquid Glass
Glossy Accents
Spellbinders Labels Twenty-Eight Dies
Sookwang Double sided tape
Scrap Ribbon
Tim Holtz Paper String ~ Brown/White
Foam Tape
Scrappy Mom's ~ Whimsical Words Stamp Set
Archival Jet Black Ink
Thank you so much for stopping by today!!


Thanks so much, that is so cute.
ReplyDeletethis is too darn cute thanks for sharing how you created it and for the fike
ReplyDeleteThank you for sharing. I love your work.
ReplyDelete